
Table of Contents
Overview
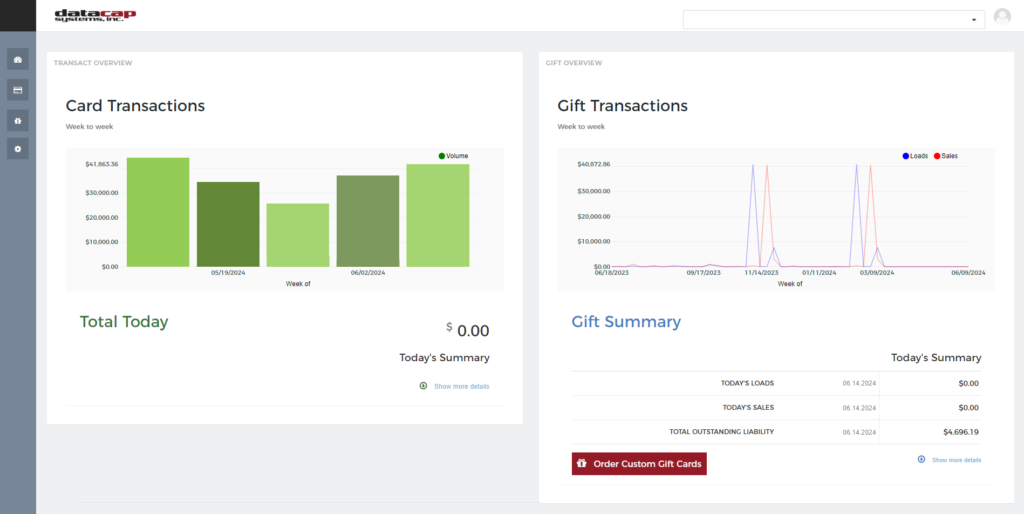
Corporate Pooling is an automated gift card balance reconciliation system that consolidates gift card transactions across multiple businesses or locations, enabling scheduled bulk payment transfers through ACH (Automated Clearing House). This system is ideal for organizations managing multiple gift card programs that need centralized financial processing and reporting.
Explanation of Terms
- Corporate Organization: The larger entity responsible for ensuring gift cards are dispersed across multiple partners.
- Location Partner: The entity responsible for either loading or charging gift cards, and in need of funds disbursement.
- Reconciliation: The reconciliation of funds loaded or discharged from gift cards between location partners.
- Corporate Pool: An arrangement between a Corporate Organization and many Location Partners to disburse funds to reconcile gift card purchases and transactions.
- Settlement Report: A report showing all reconciliations for a given corporate pool
Prerequisites
Before setting up Corporate Pooling, ensure you have:
- Admin access in the Reporting dashboard
- A valid corporate organization, i.e. a merchant id and account setup through your solutions provider
- A valid location partner, a separate merchant id and account setup through your solutions provider setup to run ACH transactions
- Banking information for ACH setup (routing number, account details)
- Contact information for email notifications
Enabled merchants show a series of links in the sidebar that lead to different parts of the Corporate Pools feature.
Getting Started
Enabling Access to Corporate Pooling
1 Log into your Reporting Dashboard account.
2 Select the corporate organization’s business from the top right corner.
3 Navigate to the “Corporate Pooling” item in the sidebar menu.
4 There will be a warning indicating you have to contact your solutions provider.
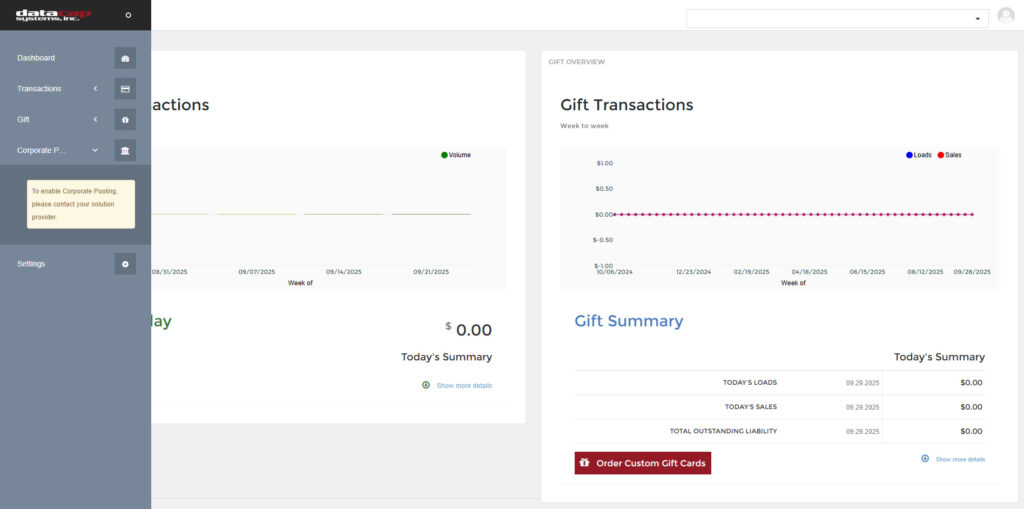
5 If you are the solutions provider, contact Datacap.
Unenabled merchants show a warning instructing the user to contact their solution provider
Accessing Corporate Pooling
1 Log into your Reportal account.
2 Select the corporate organization’s business from the top right corner.
3 Expand the main sidebar and select “Corporate Pooling”.
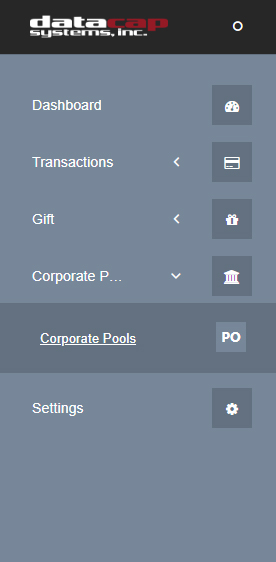
Enabled merchants show a series of links in the sidebar that lead to different parts of the Corporate Pools feature.
Understanding What’s Available
A Corporate Pooling Configuration consists of three main setups:
- Corporate Pool Configurations: The merchants involved in moving funds and the frequency at which the corporate pool reconciliation service is run
- ACH Configuration: Banking and payment setup for ACH disbursement of funds
- Email Alerts: Notification management
A Corporate Pooling Configuration instructs the system how to generate reconciliations, which is a specific disbursement at a specific time between location partners. It is facilitated by the corporate organization.
User Role Overview
Your Reporting access level determines which features you can use:
| Feature | Admin Users | Standard Users | Reporting Only Users |
|---|---|---|---|
| View Configurations | ✅ | ✅ | ✅ |
| Create/Edit Configurations | ✅ | ❌ | ❌ |
| Manage ACH Settings | ✅ | ❌ | ❌ |
| Setup Email Alerts | ✅ | ❌ | ❌ |
| View Reconciliation Reports | ✅ | ✅ | ✅ |
| Toggle Configuration Status | ✅ | ❌ | ❌ |
* Roles can be configured by your solutions provider
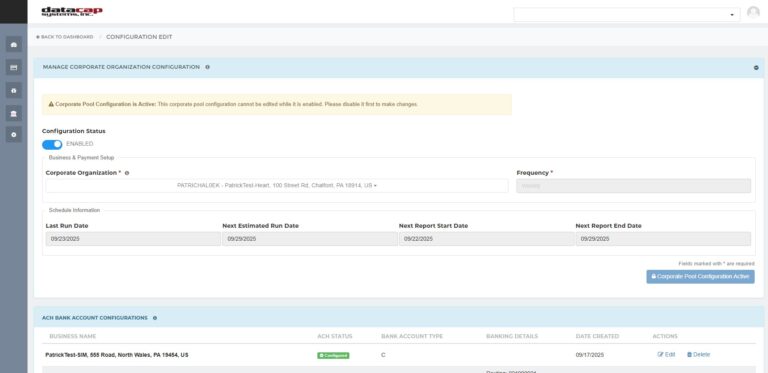
Corporate Pooling Configuration Management
Configurations define how and when your reconciliations are processed. Each configuration represents a scheduled reconciliation frequency, the merchants involved in the disbursement, and the amounts being disbursed.
Business & Payment Setup
Corporate Organization Selection
- Choose the corporate organization that will be associated with this configuration.
- This business will be the primary entity for the corporate organization.
- The corporate organization is responsible for ensuring that gift card funds are allocated properly inside the corporate pool.
Schedule Settings
Frequency Selection Choose your Reconciliation schedule:
- Weekly: Reconciliations run every Monday for the previous week’s transactions
- Monthly: Reconciliations run on the 1st of each month for the previous month’s transactions
Automatic Date Calculation
The system automatically calculates:
- Next estimated run date
- Report period start date
- Report period end date
Important: Once a configuration is enabled (active), you cannot edit its settings. Disable it first to make changes.
Errors
Sometimes, a configuration will fail to save. This is usually because something is not enabled by the solution provider. Please reference the error id returned so the solutions provider can fix the issue.
Sample error message: The GUID provided can be provided to your solution provider to address the error.
Managing Existing Configurations
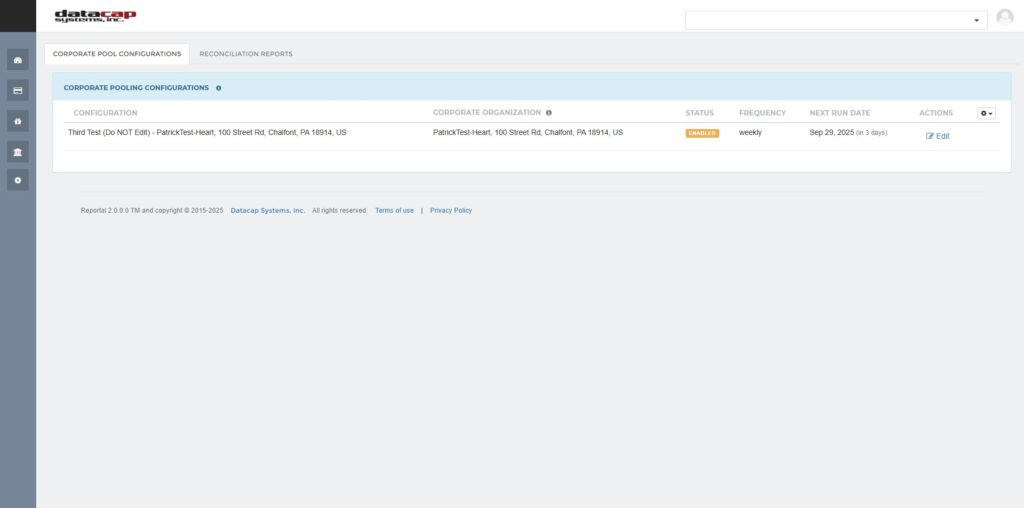
Viewing All Configurations
The main dashboard shows all your Corporate Pooling configurations with key information:
- Configuration ID: Unique identifier for the setup
- Status: Enabled (active) or Disabled (inactive)
- Frequency: Weekly or Monthly
- Next Run Date: When the next reconciliation will process
Enabling/Disabling Configurations
The manage configuration page allows you to edit an existing corporate pool.
Enabling Corporate Pool Configurations
To run, a corporate pool must be active. To be editable, a corporate pool must be inactive. This is to prevent incomplete information from being submitted for a reconciliation run. You can enable a corporate pool on the manage configurations page.
A sliding toggle shows DISABLED when the corporate pool is disabled but ENABLED when when the configuration is enabled.
To Enable a Configuration:
- Locate the configuration in the table
- Click the toggle switch in the Status column
- Confirm the activation in the popup dialog
To Disable a Configuration:
- Click the toggle switch to turn it off
- Confirm the deactivation
The enabled status can also be seen on the dashboard, where it is in an orange box. When disabled, it turns green, indicating you can edit.
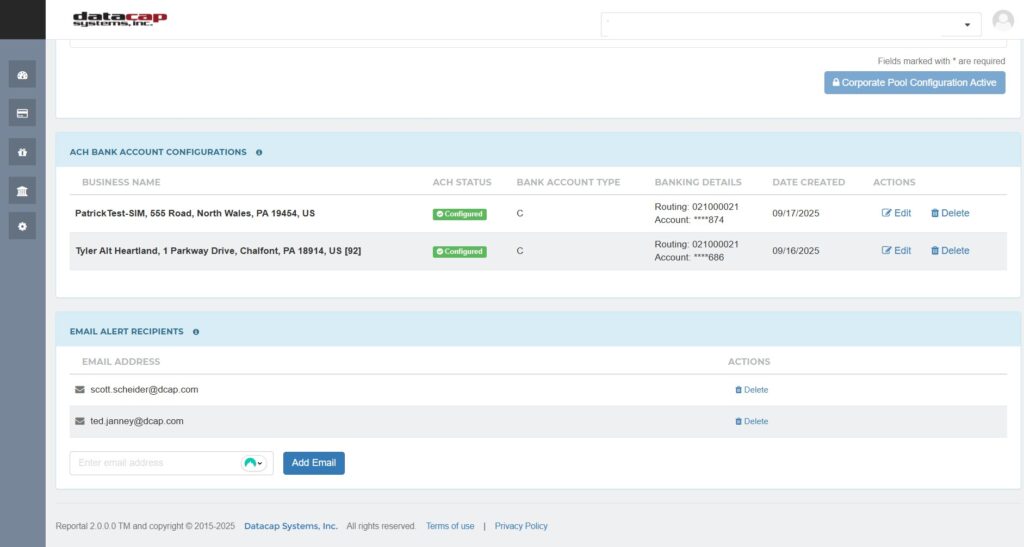
ACH Configuration
ACH (Automated Clearing House) configuration enables direct bank transfers for your settlements. Each merchant in your configuration needs proper ACH setup for disbursement of funds to occur. A Corporate Pool can exist without any ACH accounts connected, but there will be no movement of funds to any given merchant until that merchant’s ACH details are entered.
Setting Up ACH Details
Accessing ACH Configuration
From either the dashboard or the manage configuration pages, click “Edit” or “Create New ACH” for your configuration
Required ACH Information
For each business, you’ll need to provide:
Banking Details:
- Routing Number: Location Partner’s bank’s 9-digit ABA routing number
- Account Number: Location Partner’s bank account number (only last 3 digits shown for security)
- Account Type: Checking or Savings
- Account Holder Name: Full legal name on the account
Adding ACH Configuration
1 Click “Add ACH Configuration”
2 Select the business from the dropdown
3 Fill in all required banking information
4 Verify the details carefully
5 Click “Save Configuration”
Verifying ACH Configuration
Corporate Pool Reconciliations run either every week or every month. Before enabling your Corporate Pool, we recommend the following verification of your inputted information.
1 Navigate to Transactions/Virtual Terminal for the Location Partner whose details you want to verify
2 Select the ACH merchant from the dropdown
3 Input the ACH information including bank account and routing number for a small amount
4 Run a small ($1.00 or less) transaction
5 Verify with account holder they have been paid
6 Enable your Corporate Pooling configuration with those ACH details
7 Void the small ACH transaction using the Transaction Details page in the Reporting dashboard
Editing Existing ACH Settings
1 Find the Location Partner’s business in the ACH configurations list
2 Click “Edit” next to the entry
3 Update the necessary information
4 Save your changes
Removing ACH Configuration
1 Click “Delete” next to the ACH configuration
2 Confirm the removal in the popup dialog
Email Alerts
Email alerts keep stakeholders informed about reconciliation activities, errors, and important events.
Setting Up Email Notifications
You can elect to setup email alerts for your reconciliation runs. The alerts are for all location partners but can be configured for any email address. Emails will notify the user of successful and unsuccessful reconciliation runs.
Accessing Email Alert Management
1 Navigate to your configuration’s edit page
2 Scroll to the “Email Alerts” section
Adding Email Recipients
1 Enter the recipient’s email address in the box
2 Click “Add Email”
3 Verify the email format is correct
4 Click “Save” to add the recipient
Managing Alert Recipients
Viewing Current Recipients:
- All configured email addresses are listed with creation dates
- Recent additions are highlighted
Removing Recipients:
- Find the email address in the list
- Click “Delete” next to the entry
- Confirm the removal
Types of Email Notifications
The system sends alerts for:
- Reconciliation Completion: When scheduled reconciliationss finish successfully
- Reconciliation Errors: If reconciliations fail or encounter issue
- ACH Failures: If bank transfers are rejected or fail
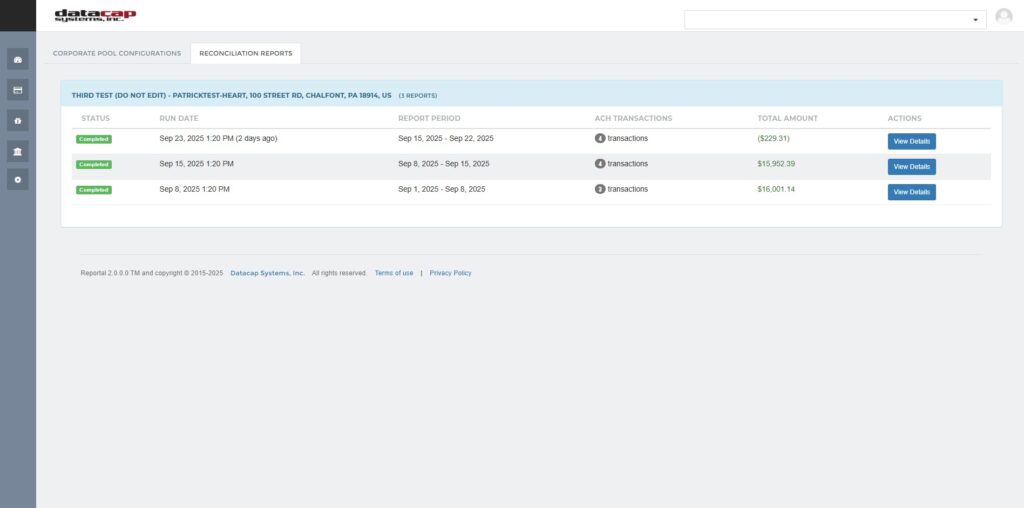
Reconciliation Reports
Reconciliation Reports provide detailed visibility into all pooling transactions, helping you track payments, identify issues, and maintain financial records.
Accessing Reconciliation Reports
- From the main Corporate Pooling menu, select “Reconciliation Reports”
- The reports dashboard will load showing all available data
Understanding Report Structure
The top section shows:
- Configurations with Reports: All setups that have generated reconciliations
- Report Count: Number of reconciliation runs per configuration
- Date Ranges: Time periods covered by each report
Each Reconciliation Report contains:
| Column | Description |
|---|---|
| Configuration ID | Which pooling setup generated this report |
| Run Date | When the reconciliation was processed |
| Report Period | Start and end dates for transactions included |
| Status | Success, Failed, or Processing |
| Transaction Count | Number of individual transactions in reconciliation run |
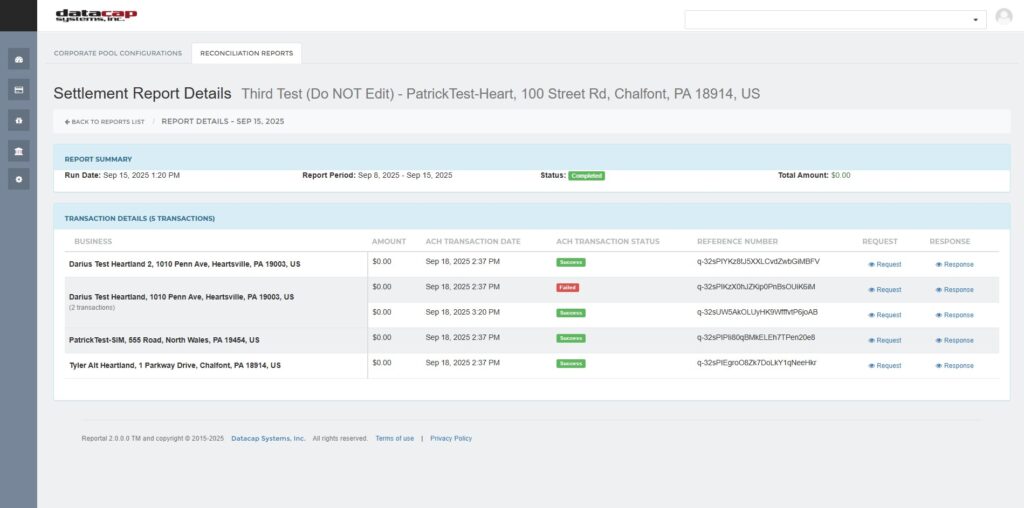
Viewing Transaction Details
Click on any Reconciliation Report row to expand details
Troubleshooting
This section covers common issues and their resolution steps.
| Error | Details |
|---|---|
| “Configuration Cannot Be Edited” | Problem: Trying to modify an active configuration Solution:
|
| “ACH Setup Cannot Be Saved” | Problem: Required fields are missing or invalid Checklist:
|
| “Settlement Failed” Notifications | ACH Rejection Causes:
Business Configuration Issues:
|
| “No Email Notifications Received” | Troubleshooting Steps:
|
| “Too Many Email Notifications” | Problem: Receiving excessive alerts Solution:
|
| “No Reconciliation Reports Visible” | Possible Causes:
|
| “Transaction Details Missing” | Problem: Reconciliation Reports show transactions but details are incomplete Investigation:
|
FAQ
How long does it take for new configurations to start processing?
New configurations begin processing on their next scheduled run date. Weekly configurations start the following Monday, monthly configurations start the next 1st of the month. This is displayed below the new configuration.
Can I change the settlement frequency after creation?
Yes, but you must disable the configuration first, edit the frequency, and re-enable it. This may affect the next run date calculation.
What happens if my bank rejects an ACH transfer?
The system will continue running the settlement for any valid ACH configurations with an optimistic attempt at completion.
Can I process settlements manually outside the schedule?
No, settlements run automatically on their configured schedule. This ensures consistent processing and proper audit trails.
How far back can I view settlement history?
You can view settlement history back to the first enablement of the Corporate Pool configuration. Settlements will only be available if the configuration was enabled.