What do you need to connect the PAX A35 via Ethernet?
Configured network and router
Network name and password
PAX A35 configured with Datacap keys and the appropriate Datacap ECN
Ethernet cable(s)
Connect Ethernet cable
1 Connect an Ethernet cable to the A35's back plate LAN port and to your network.
If using DHCP, no further setup should be required (Ethernet w/ DHCP is enabled by default). If using Static, continue to the next steps.
Access Android Desktop
1 Swipe up from the bottom of the screen.
2 Touch the back key ◁ twice.
3 When prompted for Back Desktop password type "pax9876@@". Touch "Enter".
Note: “123456” may work on some devices as passwords may vary. For EVO Snap devices, use “EVO72963687” for the password.
Connect to Ethernet
1 From the Android Desktop, touch "Settings".
2 When prompted for password, type"pax9876@@". Touch the green checkmark icon or "OK" depending on which prompt appears.
Note: “123456” may work on some devices as passwords may vary. For EVO Snap devices, use “EVO72963687” for the password.
3 Touch "Network & Internet" >"Ethernet".
4 Select "Ethernet Configuration" > "Static".
Enter the values for the following by scrolling under the Static IP settings:
IP address
Gateway
Network prefix length (this is your subnet mask in CIDR notation)
DNS 1
DNS 2
5 Touch "SAVE".
6 Touch the home button ○ to return to Android Desktop.
Pair POS and DC Direct
Configure your Point of Sale using the DeviceID, the corresponding Merchant IDs (MIDS), and Terminal IDS (TIDS).
If using Wi-Fi or Ethernet connected PIN Pads, configure your POS with the corresponding IP addresses and port numbers from Step 4 above.
1 Tap the DC Direct app from the Android Desktop To view the DeviceID (serial #) and connected IP address.
Android Desktop
DC Direct Settings
2 Touch the home button ○ to return to Android Desktop.
3 Touch "PXRetailer" to return to Welcome Screen.
If you need help pairing DC Direct, contact your POS provider for specific instructions.
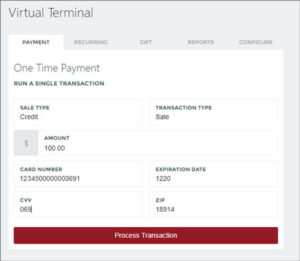
Run a Test Transaction
Initiate a $1.00 test sale from your POS.
Verify that all test transactions successfully reached NETePay Hosted™. Login to your dashboard via Datacap's Reportal to view transactions. Contact your processor to confirm that all transactions were received and the appropriate accounts were funded.
Run a “card-not-present” transaction using Datacap’s Virtual Terminal. To configure the Virtual Terminal, enter your merchant secret key generated from PSCS. Refer to your Reportal dashboard to view/confirm any Virtual Terminal test transactions.